• Home
  • Episodes 
  • Blog
  • Be a Guest
  • About
  • Media
  • Podcast Production
  • Shop
  • Contact
Menu

FINDING ARIZONA PODCAST

Street Address
City, State, Zip
Phone Number
Podcast for Arizona, in Arizona, by Arizona

Your Custom Text Here

FINDING ARIZONA PODCAST

  • Home
  • Episodes 
  • Blog
  • Be a Guest
  • About
  • Media
  • Podcast Production
  • Shop
  • Contact

BUILT IN LIBRARY WALL

February 18, 2023 Britt Johnson
 

This has been one of the most involved projects we've worked on. Over 5 years in the concept, 1 year in the design and sourcing for 1 day install…Totally worth it! The built in library wall of my dreams!


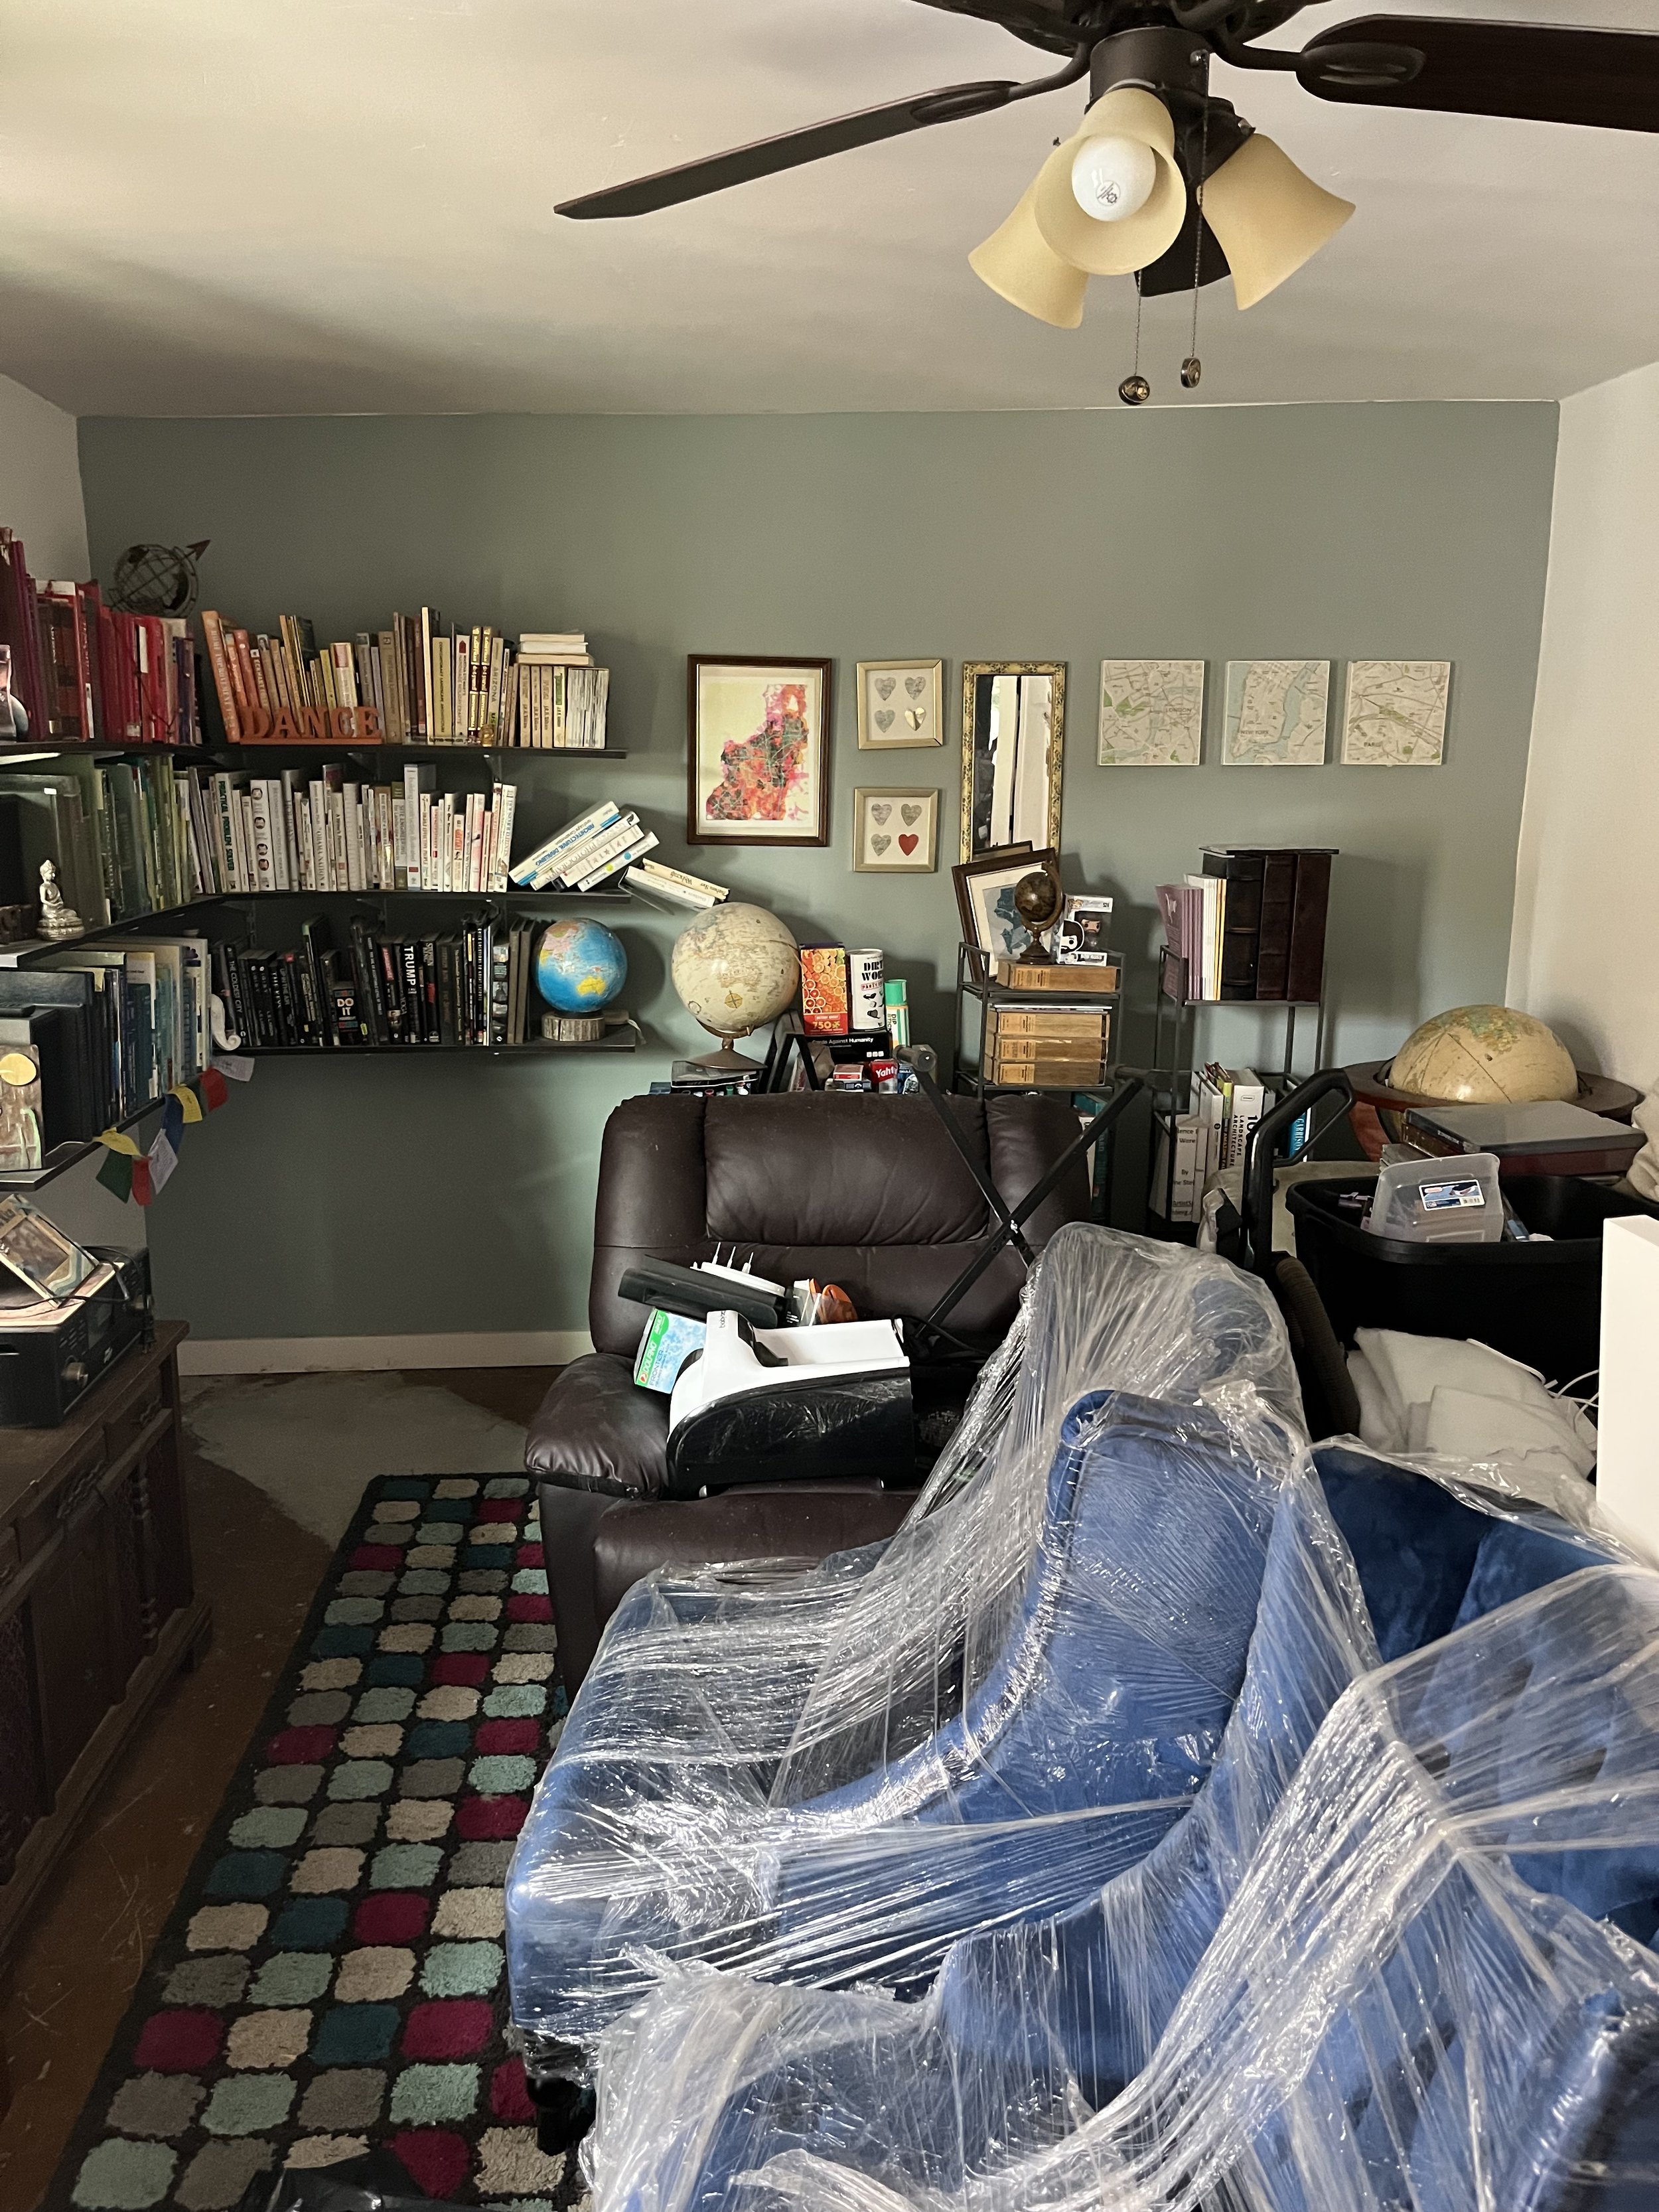
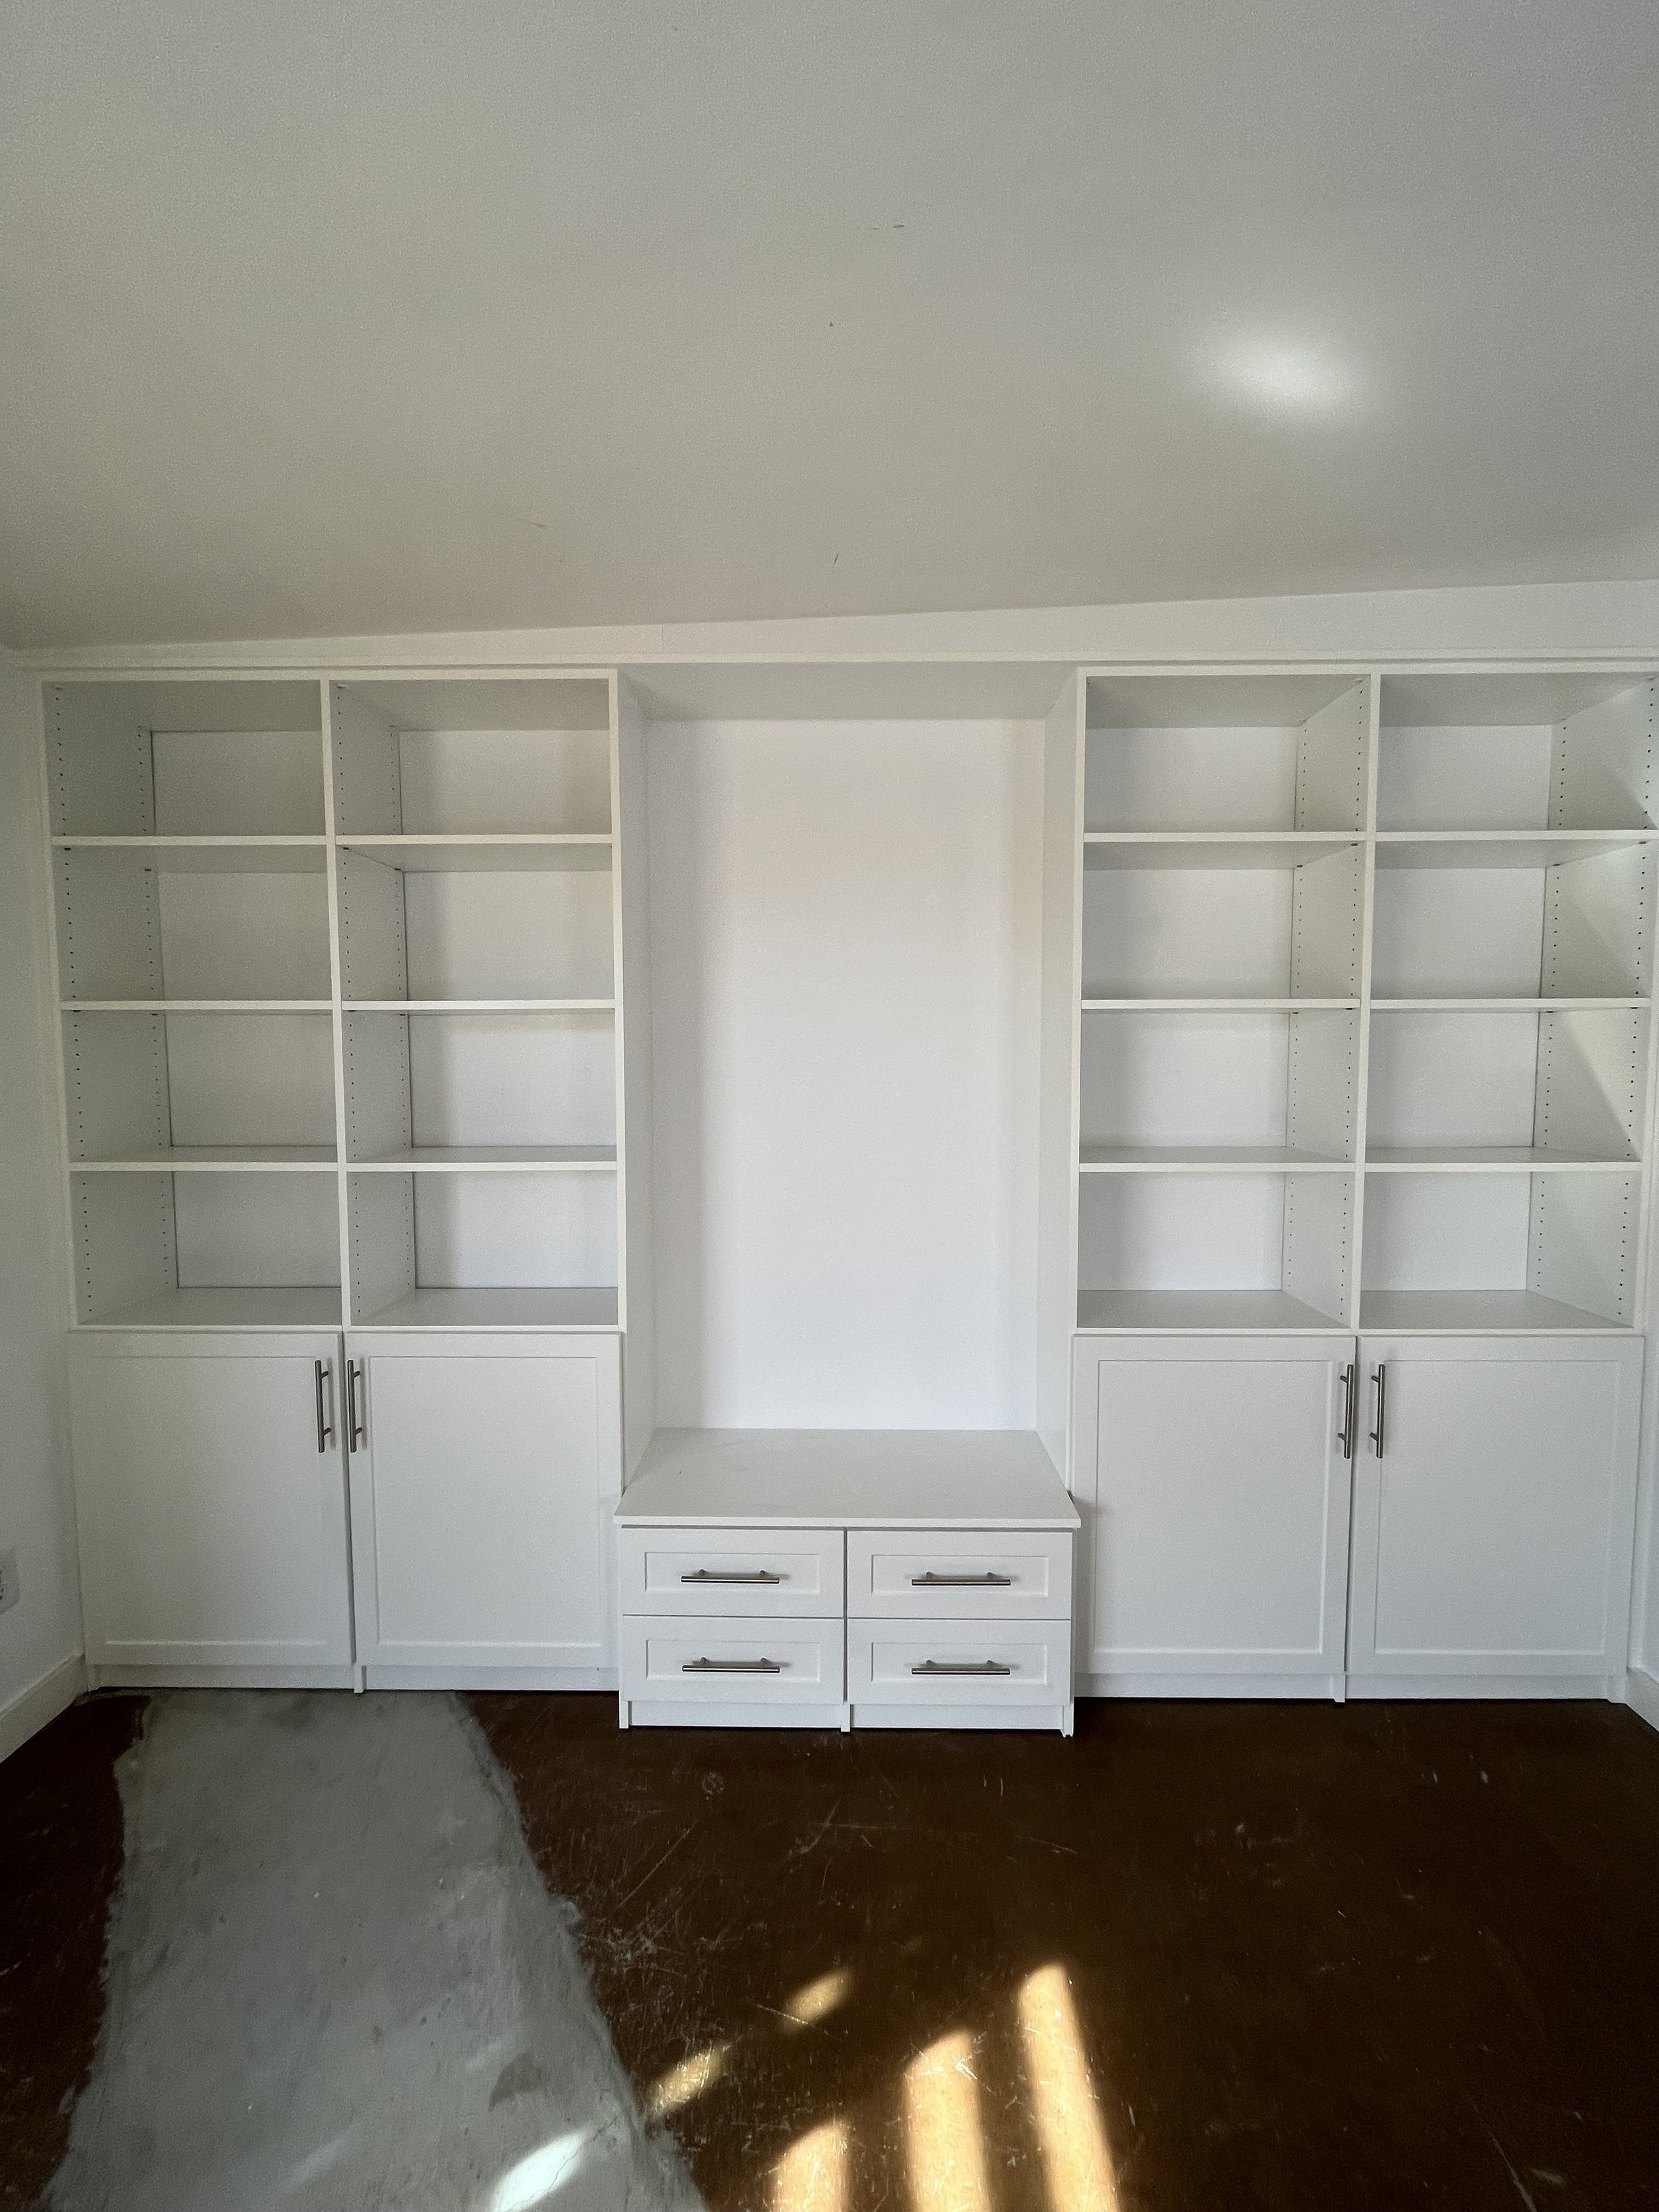
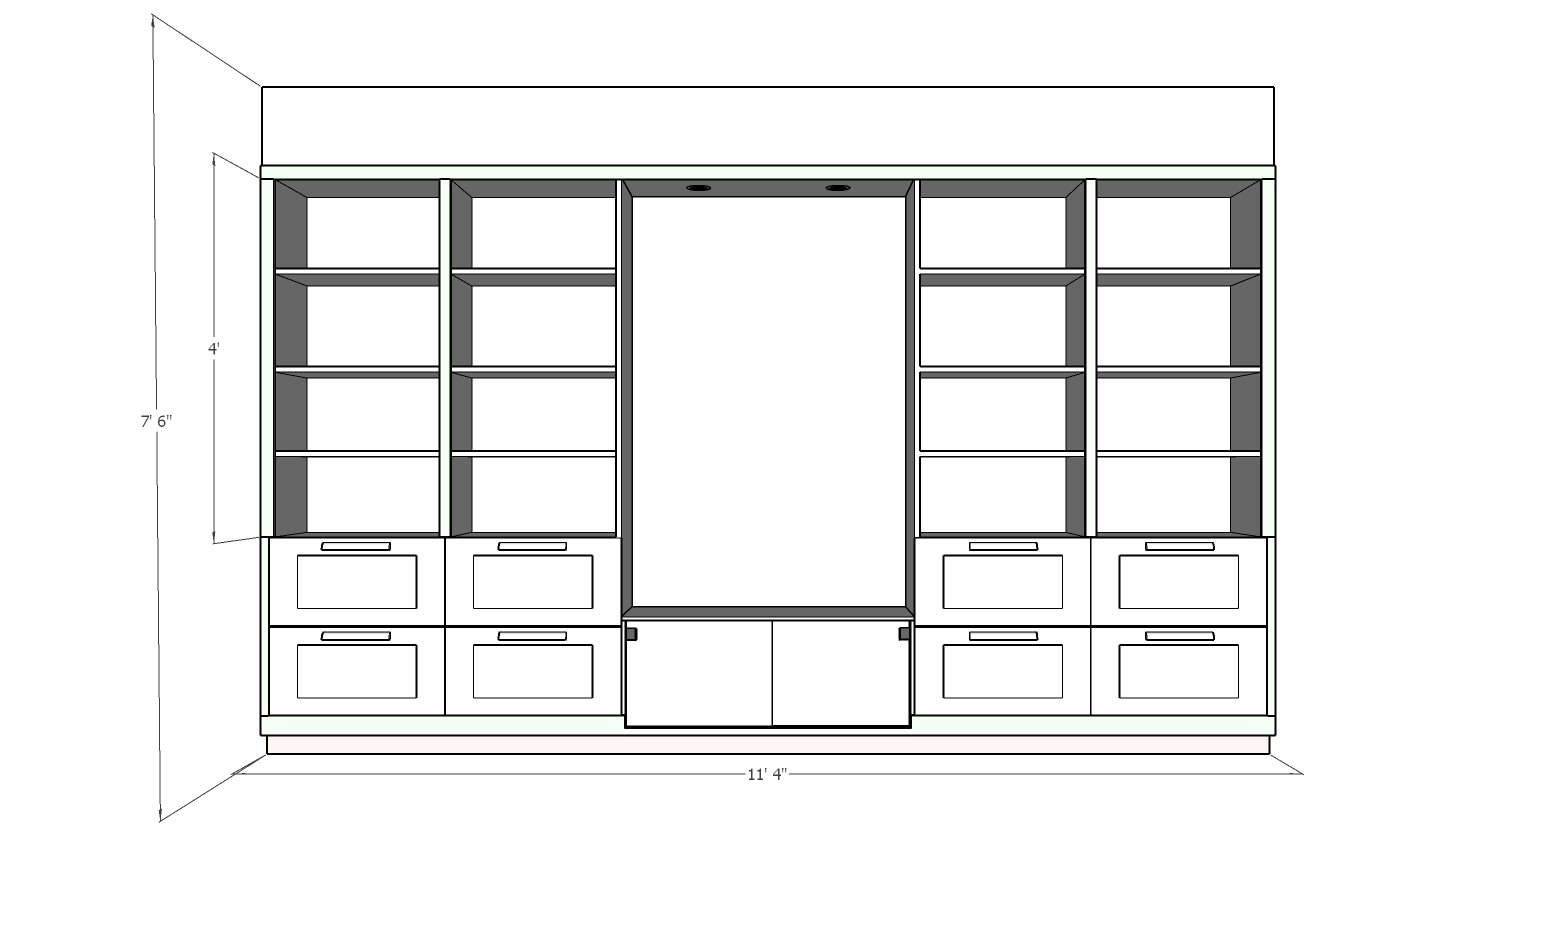
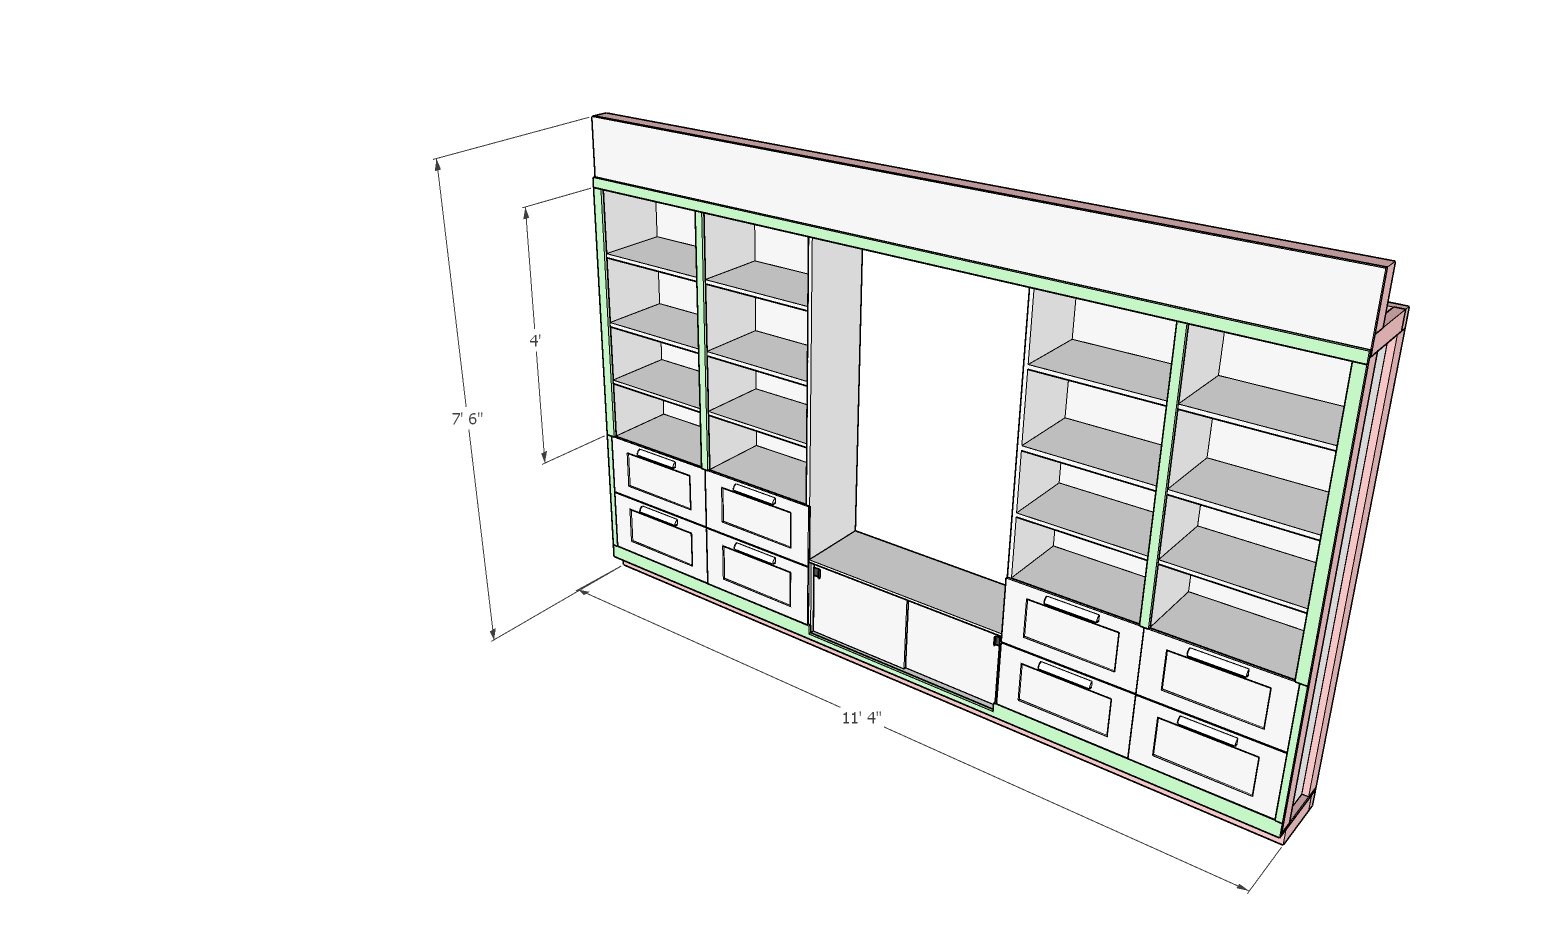
The library consists or 2 large cabinet bases, two 3 tier bookshelf tops, and a bench nook overtop storage drawers to bring it together. The room originally had the Home Depot track shelving. Six of them. After dreaming of a built in and several trips to Ikea later, we sketched up the design. Then life happened.


A year went by and no time was found between 2 full time jobs + podcast + toddler + life ?!? Okay lets be smart about opportunity costs. Using our amazing podcast guest referrals of someone who knew someone who knew someone, Debbie, from Closets by Design was at our house.


Although the install was to be 4 months in the future, it too passed quickly. After a quick couple hours and an amazing team of installers, we have the bookshelves of our dreams. Lets just say organizing it was enough work. Over 400 books with a toddler was an activity in itself.


It is my new favorite space, I am sure you can see why. Come on over and enjoy it with us!

XoXo
Britt

 
IMG_9465.jpeg
IMG_2159.jpeg
IMG_2175.jpeg
Libraryshelf-2.jpg
Libraryshelf-1.jpg
In Home Tags DIY, Build, Custom Build, book, bookshelf, sketch up, historic, downtown, phoenix, Phoenix AZ, Phoenix, arizona, Arizona, builder, DIY project, closets, design, Interior Design, closet design, built in
Comment

ACEVEDO DESIGNED ACEVEDO BUILT

July 18, 2019 Britt Johnson
Finding AZ  Renno
 

A few weeks ago, Jose posted a photo of our newly finished product, the pergola! Acevedo designed and Acevedo build, the deck and the pergola are the newest additions to the FInding Arizona Home and we are one step closer to the wedding date and the backyard looking fabulous! I wanted to take this time to highlight the amazing team behind Pair of Aces. My amazing father in law and his business partner work so hard to deliver quality results and treat every project like it is apart of their home.


Our deck was the first project the Aces worked on. This gigantic 16x18ft deck was put up in 3 days and elevated the space in so many ways. We went from a 2x4ft plastic deck to a massive idahoan wood dance floor. I came home from work one day and had the pleasure of screwing in the last screw! Speaking of dance floor: it has been brought to my attention by a close friend, and professional that if you are attending the Finding AZ Wedding DO NOT wear skinny heels. Block heels, wedges and flats are preferred, not only for the deck, but the grass ceremony and gravel dinner. I am sure at one point all shoes will be off, but just a side note.

 
Sketch Up Finding AZ  Renno
 

More recently, the pergola was designed and installed. I loved watched Jose use Sketchup to bring his design to life. I joked that the model in the photo looked just like him! Right?


After printing out measurements to the team, the Pair of Aces were off to work cementing in footings and getting all the wood we need to sand and stain. We wanted to work smarter so we sanded and sealed each piece of lumber prior to it going up. This meant late nights and sore muscles, but now that it is all up we are so glad we took the tame to protect the wood.


Each hour casts a different shadow on the pergola creating the most breathtaking shadows. Yesterday afternoon I was sitting in our library gazing out the sliding glass doors in awe of the hand crafted masterpiece. From the block wall, to the deck to the pergola all I want to do is hangout outside in the yard and admire. BUT of course in the pool, because we have officially hit triple digit teens in AZ!


Time to book your travel plans and pack your bathing suit. I fixed up the guest room for some amazing people staying with us in July, and of course, will shared the details on the blog here! No, it’s not a real Air BnB but it feels like paradise to us everyday.

XoXo

Britt

 
IMG_3717.jpg
Screen Shot 2019-06-30 at 8.50.20 AM.png
IMG_3716.jpg
Screen Shot 2019-06-30 at 8.51.32 AM.png
IMG_5096.jpg
Screen Shot 2019-06-30 at 8.52.42 AM.png
IMG_5099.jpg
Screen Shot 2019-06-30 at 8.51.05 AM.png
IMG_5086.jpg
Screen Shot 2019-06-30 at 8.53.14 AM.png
In Home Tags homeowner, Home Rennovations, Design, Custom Build, Build
Comment

BUILD A WALL

May 9, 2019 Britt Johnson
IMG_4375.jpg
 

Britt the Builder here! I earned the right to call myself this! I finally finished my wall! What started from a pinterest inspo, like most, turned into an amazing, one of a kind, art wall installation. We are in the thick of Finding AZ Engagement and we are putting some serious work in our backyard for the big day. One of the biggest projects I was excited to take on was a feature wall. Repurposed. Herringbone. DIY. These are all big buzz words I was ready to take head on and now that it’s over I can share, my blood, sweat and tears.

 
THIS is the exact screen shot I took scrolling through the gram one night! If you’re not following Young House Love you need to. Great book, podcast, page & people!

THIS is the exact screen shot I took scrolling through the gram one night! If you’re not following Young House Love you need to. Great book, podcast, page & people!


I had 2 major focuses for this project: The Budget and a Custom Design. First, I wanted to use all 100% repurposed wood! I started breaking apart pallets back in February using ones from work with our weekly shipments, then I would cruise the backside of Lowes for minis I could fit in my car. Towards the end of the March I found a craigslist post for a junkyard giving away pallets, but by the final weekend in April, I was pulling old fence posts from our pool pump station. Crowbarring wood from pallets may look easy. I YouTubed how to do it and the Salvage Sister didn’t even break a sweat. Let me tell you this is where most of the blood, sweat and tears came from. I used over 150 pieces of raw pallet boards.


Next, came the custom cuts. Using a Ryobi Hand Saw for the first time was an experience. Mostly because I am left handed. I mean, if you are right handed try using ANY power tool backwards! It is like relearning muscle memory. I sliced each board 3 inches wide (not knowing about standard / mill sizes) and then 30 inches long. After my first 7 boards my arms were tired. I have never worked out like this before. This process took the longest. From setting up and clamping each board, to measuring twice and cutting once. Once I ran out of boards and thought to purchase some at a local home improvement store. I was taken back because each 1 x 3 measure 1 x 2.5! So back to custom cutting! What felt like years late, I was ready to start nailing.

 
IMG_3488.jpg
IMG_3474.jpg
IMG_3465.jpg
IMG_3492.jpg
 

I watched video after video of installing a herringbone wall and it looked so easy. Some were using peel and stick, others had pre-measured boards, but none using repurposed pallet wood and custom slices. But, they all had one thing in common. Start from the middle. I measured my exact center. T squared it off and then used my protractor to find that 45 degree angle. Once the first board was up, it was just plug, level, and play. I used a powerful nail gun with air compressor. The only type for the job because my electrical one didn’t have nearly enough power! A time lapse and a few jumps in the pool later, the easy part was done.

 
IMG_3829.jpg
57807825249__3E449E51-F559-481F-9F1C-4D248043F04B.jpg
 

Thankfully, my father showed up unexpected and unannounced from San Diego that evening and little did he know I was putting him to work on the wall the very next day! Custom sizing and recutting the outer edges came next. We had to place the board in the right puzzle place then measure twice where to make the cut. Using our Ryobi MIter Saw get the perfect 45 degree angle and make the cut. Literally every board is custom cut, some even twice. This overall took 3 days to get all the pieces up!

 
IMG_4299.jpg
IMG_4251.jpg
IMG_4301.jpg
 

After the wall was up, I took our Ryobi electric belt sander to the wall to smooth out any splinters and prep the wood for paint. I chose 3 colors based on our home shades, wedding pallet, and inspo from the photo. The cream was from the “Oops” section of Home Depot. If you don’t know about this section anytime a paint color is mixed and rejected or returned unopened it immediately goes on sale and is set in a clearance section right near the pain counter. This gallon was originally was $35 and I got it for $13.98. The perfect color match too! To simplify the paint project I primed the entire wall with this color to start. Two solid coats, then I could begin taping for the next color. “Rockspring Green,” from Glidden was the name of the next color. I taped off every 3rd board, following the design from the photo and began applying. After the green came “Almost Pink,” another Glidden color. I purchased quart amounts for these two colors and paid the same amount for each quart as I did for my gallon. I also trusted my hand and my paint brush to apply the pink free handedly. No tape, no more patience. The pink is not as pink as I would have liked, but too pink would have been too much!

 
IMG_4362.jpg
IMG_4364.jpg
IMG_4365.jpg
IMG_4368.jpg
 

Now we get to admire it, and when I step back and look at my work of art I cannot help but smile. I created it! From vision to conception. I feel like I can take on any project now. Would I create another custom herringbone wall? Yes! So if you’re in the market, hire me!

XoXo

Britt the Builder

 
IMG_4300.jpg
IMG_4306.jpg
IMG_4367.jpg
In Home Tags homeowner, Home Rennovations, Home Makeover, Herringbone, DIY, Custom Build, Photo Wall
Comment

COPYRIGHT © 2025 FINDING ARIZONA PODCAST | ALL RIGHTS RESERVED | PRIVACY POLICY